Light & Shade
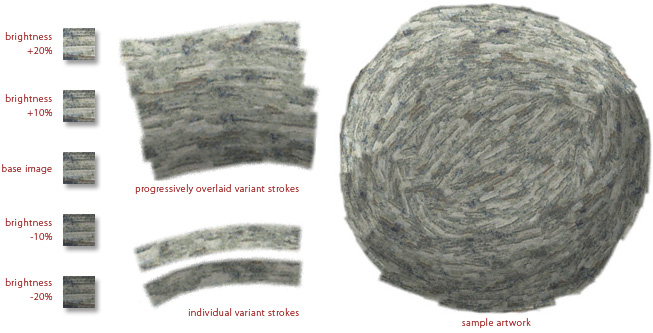
Using the source image transformation technique described in the previous section, you can achieve compelling light and shade effects in Studio580 (note: if you haven’t yet read the “Source Image Transformation” section on the previous page, do so before proceeding here). To render an object in light and shade, you paint shadows and highlights onto its surface, striving to mimic how similar natural objects reflect and obscure light. The source image transformation technique of the previous section can assist you in this task by furnishing you with an entire family of brushes whose members differ only in their relative brightness and contrast. This technique is illustrated in the figure below.
To apply this technique in your own work, proceed as follows:
Create a new base image or choose an existing one—begin with a base image that characterizes the base color and tone of your object, unaffected by the influence of light and shade. Use the base image as the source image of a brush object in Studio580. We’ll refer to the Studio580 brush object that has the base image as its source image as the base brush. In the figure above, the base image is shown at left center.
Produce light and dark variations on the base image—you can do this in any image editing application that supports working with TARGA images. In the example shown in the figure above, we’ve produced four variant images: two progressively lighter and two progressively darker than the base image. Getting good results usually requires tweaking both the brightness and contrast controls in your image editing application. It’s a good idea to name these variant images descriptively, such as “MyImage +20.tga” for a variant that’s 20% lighter than the base image, or “MyImage -10.tga” for a variant that’s 10% darker than the base image.
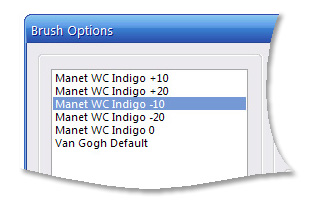
Create a family of related brushes in Studio580—using the techniques described in the “Source Image Transformation” section on the previous page, you’ll repeatedly clone the base brush, making small changes to each new clone produced. For each variant image that you created in the previous step, clone the base brush once. Then, for each of these new clones produced, set the clone’s source image to one of the variant images, until you’ve produced a new brush for each of one of the variant images you created in the previous step. It’s recommended that you name each these brushes accordingly. For example, name the brush that uses “MyImage +20.tga” as its source image “MyBrush +20.” At the end of this step, you should end up with a family of descriptively named brush objects in your brush list. The figure below shows such a brush list.
Paint the form of the object—using the base brush, stroke out the basic shape the object will occupy in the overall composition.
Layer variant strokes to create light and shade—overlay progressively darker strokes made from your darkened variant brushes in regions of the object that are in shadow. Likewise, overlay progressively lighter strokes made from your lightened variant brushes in those regions of the object that are lit. You can achieve excellent blending between overlaid and ground strokes by enabling edge noise in the Brush Options dialog box before painting the overlaid strokes. For a discussion of the Brush Options dialog box and the elements in it, see the Quick Tour.